Showing posts with label Tips of the day. Show all posts

5 Tips to keep your Laptop up and running

Don't let your laptop run out of steam before you do

5 tips to keep you up and running
Keeping your laptop up and running without the benefit of an outlet requires smart, effective use of your battery's energy. Whether it's a long flight or an afternoon in the park, knowing what's draining your computer's energy can help you get through with runtime to spare. Here a few things you can do to make sure your laptop doesn't power down before you're ready to call it quits.

1. Dimmer lasts longer

Turning down the brightness on your screen is an easy way to squeeze some more juice out of your battery. See how dimm you can get your LCD without squinting. keeping in mind that every squint is gaining your uptime.

2. Unplug unnecessary devices
Unplugging unnecessary external devices will save your energy from wandering down a dead end street. Even when not in use, anything plugged into a USB port such as a mouse or an external keyboard uses energy just sitting there, and that power can add up quickly, especially when speaking in terms of multiple devices.

3. Minimise running programs

Shut down any applications not integral to what you're working on. This means anything running in the background, from toolbar search engines to music programs and web pages. Even having an unused CD in the drive uses energy.

4. Keep it cool

Making sure your laptop stays cool will help it run more efficiently and efficiency is the name of the game when it comes to extending battery life. Check the air vents to make sure they're not obstructed, and consider buying a laptop stand so it doesn't have to sit directly on your lap.

5. Hibernate not standby

Keeping your laptop on standby is convenient, but is convenience comes at a steep price compared with the hibernate function, which uses far less of your's laptop's precious resources

Hiding the Last User Logged On

well, sometimes this could really disturbing and you maybe don't wanna know when you go to the victim computer and log in and you wanna make it hidden.

well,so you can try this method

If you use the standard NT style of login and want to hide the last user:

1. Start the Group Policy Editor (gpedit.msc)
2. Go to Computer Configuration / Windows Settings / Security Settings / Local Policies / Security Options
3. Scroll down to Interactive logon: Do not display last user name
4. Set it to Enable

Telkomsel Dangerous Code

Just found this code on my friend mobile phone where got hack, let say like this. when he sent a SMS to person A, by automatically the person B will receive the same sms person A receive. got it.. this only works on indonesia Telkomsel Provider [I guess]..
so here how it work.
you must got the Mobile Phone of victm and type this code on sms format

type MENU and sent to 2255

there a reply sms after you sent it that say a few option that you can use, just like below :
SMS PRO:

1. Service Info
2. Auto Reply
3. Divert
4. Copy
5. Black List
6. White List

I only know function for number 4 option, when you reply with option 4 on victim mobile phone you will get sms from and for who the victim sent it sms, but first you must supply a mobile phone number that sms will delivered too [your mobile phone]. you will get the same sms also that will copy to your mobile phone,.. [very creepy uh..] also in packet SMS PRO there is option that you can hear what victim talking between victim and his partner and your mobile will also get the same voice [in this case], as long as they talking you also available to hear it...

I think there is other option on this and I still looking for the code or maybe telkomsel don't want to give to public, just like on tap case of Artalita Suryani that people can hear what she say to her partner. of course KPK on this case :D

My advice: don't put your mobile device on random place that you eyes can't covered, so other people will take advantage of this.

let me know if you have similar code and that would be great if we can share each other.
~ GreetZ

Summary for Bahasa Indonesia
" Dengan menggunakan service sms ini kita dapat mengetahui sms dari korban kita yang mengirimkan atau menerima sms dari teman-teman nya maka akan otomatis terkirim ke Hp kita,..."

enjoy, leave comment if you have something in your head

Making Good Password


Just found this article around the internet, hope you can take for advantage of it, well here what you should know

1. Make a password with 8 characters or more. The longer you make more harder to crack, but dont forget it !

2. And don't write it in a sheet of paper. Maybe you want to use your own code, but you may forget the way you should read it ?

3. Make a password with combination of all alphanumeric characters (letters and numbers). With case-sensitive password is recommended. If allowed and you're too extreme, use symbol. and some people too extreme using alt+xxx ... LOL :D

4.Don't use typical wordsyou might find in your dictionary or dictionary-attack word index file. The word like, "Administrator", "default", etc

5. don't use these lazy combination : "zxcvbnm", "zxcvbn", "asdfgf","qwerty","abcde123456, etc; you know what I mean. If you're too extreme use a password generator

6. Don't use the same password for each of your account (gosh,.. I'm not to doing this either :D he heee..)

7. don't tell anybody your passwords (tha's abvious, you know, unless your parents highly insist it, because I'm not teaching people to disobey their parent) !

8. Don't use person, a company, or a pet typical names for your password or recovery question

9. If you think you don't need recovery question anyway, just input bullshits around

10. Well you may use a unsual word in english, but as I say in point 3, don't just " pneumonoultramicroscopicsilicovulcanocaniosis"

trust me, in out there, hacking happen, I've try by my self and guess what, it's work for me

GreetZ

How to NOT click your own Ads [Newbie ONLY]


Usually when you work from home, you got a kid that similar with the Computer that you already use, so without you know, could be the kid will click your ads that save on your bookmark page, to avoid this you can use this methode to NOT display ads on your personal computer.

another way is using host on your operation system, on this case windows:
find first host based on your Grade OS


Windows XP: C:\WINDOWS\system32\drivers\etc
Windows 2000: C:\WINNT\system32\drivers\etc
Windows 98 or ME: C:\WINDOWS\

open it with right click[ you can use notepad or something like that]

you will see:

127.0.0.1 localhost

you can add below default entry the following item[ in this time we gonna block google adsense, google analytics, urchin and chitika]:

127.0.0.1 adwords.google.com #[Gmail ads]
127.0.0.1 pagead.googlesyndication.com
127.0.0.1 pagead2.googlesyndication.com #[Google AdWords]
127.0.0.1 syndicate.googlesyndication.com
127.0.0.1 syndicate2.googlesyndication.com
127.0.0.1 googlesyndication.com
127.0.0.1 adservices.google.com
127.0.0.1 syndicate.google.com
127.0.0.1 syndicate2.google.com
127.0.0.1 ssl.google-analytics.com
127.0.0.1 www.google-analytics.com #[Google Analytics]
127.0.0.1 google-analytics.com
127.0.0.1 imageads.googleadservices.com
127.0.0.1 imageads1.googleadservices.com
127.0.0.1 imageads2.googleadservices.com
127.0.0.1 imageads3.googleadservices.com
127.0.0.1 imageads4.googleadservices.com
127.0.0.1 imageads5.googleadservices.com
127.0.0.1 imageads6.googleadservices.com
127.0.0.1 imageads7.googleadservices.com
127.0.0.1 imageads8.googleadservices.com
127.0.0.1 imageads9.googleadservices.com
127.0.0.1 www.googleadservices.com
127.0.0.1 apps5.oingo.com
127.0.0.1 oingo.com
127.0.0.1 www.oingo.com
127.0.0.1 service.urchin.com #[Urchin Tracking Module]
127.0.0.1 ads.chitika.net #[IE-SpyAd]
127.0.0.1 ads1.chitika.net
127.0.0.1 blogads.chitika.net
127.0.0.1 ca.chitika.net
127.0.0.1 mm.chitika.net
127.0.0.1 scripts.chitika.net

after you add this stuff and then save it.....

Create an AutoBlog

For those people who have a lot blog, maybe they can't manage all of them and probably only update that have a good traffic and higher pagerank, but today we gonna discuss how we update manually all blog we have with automatic especially on blogspot.

Follow this instruction

first step:
+ you should already have blogspot of course...:D

Step 2:
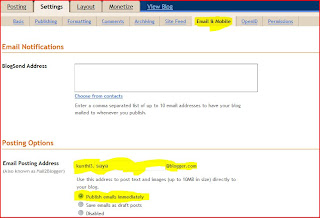
+ Login with your gmail account on your blogspot dashboard, and go to Setting and choose email and mobile tab.[preview screen are below]


Notice: when you choose "POSTING OPTION" you should supply your email blogger, for this example " kunthi3.saya@blogger.com" [based on the picture above] and it means the blog will start posting automaticly with this secret email.If you done with this step now you just need to find a appropriate RSS feed that suitable with your blog content.

Step 3:
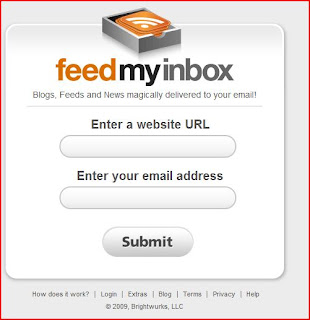
+ Next you should to is go to this url: FeedMyInbox.com[+]


complete all field that requested, like
Enter a website URL : http://preview-shopping.blogspot.com
Enter your Email Address : kunthi3.saya@blogger.com [based on step 2]

Done......!!!, plus minus of using this method is your blog content will exactly same with the blog from the Rss Feed that you taken and of course it much timesaving when you do posting, but also Google doesn't like that[ if you running Google Adsense on your blog advertisement]

Create an Auto Reply message

Create Create an Auto Reply Message in Outlook Express - Microsoft Windows Tips
--------------------------------------------------------------------------
If you ever have the need to let people know that you are out of town or do not have access to your e-mail and would like your computer to send them an auto reply automatically when they e-mail you here is how you do it.

1. Click Create Mail. Type the subject and message you would like to have sent back to them in the auto reply and then click on File, Save As. Give your auto reply a file name that you will remember and change the type to text, click on Save and close the e-mail window.
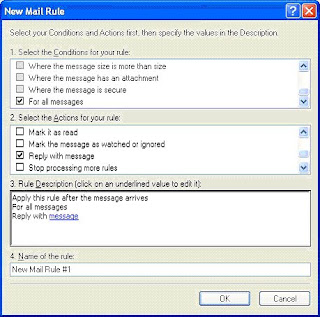
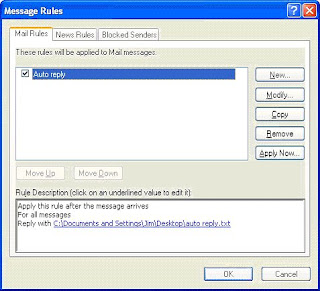
Next you need to make a rule for your message. Click on Tools, Message Rules and choose Mail. Click on New and in the box # 1; choose the last option that says For all messages. In the box # 2, choose Reply with message and in box, # 3 click on the blue link that says message.


A new menu will appear and you can browse to find your saved auto reply message. Make sure you change the type to text so you can find your auto reply message. Select your file and then click Open. In box # 4 you can name your rule something like Auto reply and then click Ok. Then you will confirm your rule and you can click Ok.


Then a dialog box will come up asking you where you want to place your selected rule. Select the Inbox as the folder you want and then click Apply Now again, then Close. Then click on Ok.

that's it. For how to make auto respone email on your account via website I have allready post-it, just searching on my latest post.

Google Different

Most user all over the country when they using search engine, especifically Google they will front in with google in their own country, like google.co.id [Indonesia], google.co.hk [Hongkong], google.co.sg[Singapore] and more with all over the country.
For this time I gonna show you difference things between google in your region country and with this Google, in my opinion if you wanna find anything to make post in your blog or website in order you wanna apply adsense maybe you can use google that I offer... what I mean is you just do Copy Paste on your blog, there more option you can choose what you wanna write to on your blog, there is topic about Politics, Finance, Science, Business, Movies, Entertainment, Sport, Tehnology, just appropriate with your blog that's it and wait for google adsense approved you.
here is difference picture between google in your regional country and with this Google.


difference option in blog searching [google.co.id [indonesia] with google.com[link]]
PS: I don't type any word in search address


and more additional option on google image search


that's it, if you wanna apply on google adsense maybe you wanna consider what I'm writing here.

Move your Feedburner Account to Google

Mostly this is happen to Publisher Adsense who have alot subscriber via Feedburner.com and want to move they account to google account, I have seen alot question about " how to move bla...bla...bla..., I can Move my bla...bla....bla... or maybe I have a problem to move My Feed to Google Feed what should I do and a lot more...

But in this time I wanna share how I move my Feedburner Account to Google Account and It's work for me :D

Follow this step by step:

Sign in with you google Adsense Account on Feedburner.google.com if it's work you can see you dashbord with feeds you already have it. and then you can begin move your feed to google account, but if not works.... Hmmmm this what you should do
open new tab on Firefox or new window if you use internet Explorer lower version and log on to Feedburner.com after log in you will get 3 option that mention which something like this:

option 1. sign in with your google account [adsense available or anable] -----> something like that
option 2. sign in with Feed account [adsense available]
option 3. make a new google account

the next step you do just choose between option 1 or 2 and you will get announcement that you're success move your feed's to google feed and from now you have to log on with this address http://feedburner.google.com if you wanna edit or add your feed.

that's all bro.. leave a comment if you success or failed move your feed's and dont forget give me support.

Make Adsense Apply you.......

Make Adsense Apply you.......

* Hello world
* this is Oby_One again with trick to get you approved by Google Adsense, mostly people make a website or blog and then they apply on google, but today I gonna show you, how google apply you, yes that's right google apply you for join in their programm publisher

here is what you need to know:
first of all the thing is you MUST have a website, that would be Blog, wordpress, domain or whatever as long as internet can access, and then write anything you like, anything just full fill your website. The next thing is promote your blog to search engine, blog directories, link exchange, or feedburner to increase your Pagerank, traffic and subscriber, but dont forget to place a little bit of ads, remember NOT Google ads, anything but not google ads, got me....

and now, this is the main point, make your blog or website running at least for 3-4 month, on my case I have run my blog for about 9 month :D [what a long journey, but look the effect]. and here is 2 screen preview if google want you to join in they program


as you can see above, there is a difference between 2 picture, when you got you blog with word that show in pic 1. now you can apply to join google, I can guarantee that you will get your pub id google adsense. No doubt. on my case [again....???? please..] I have apply on google 3 times, the 4th was successfull after I got word just like on picture 1.that's it for today from my experiance apply on google, I hope you will get your Adsense Account, leave a comment if you have any question

Payment made

First Payment made......

Get Chitika Premium

a few day I go was my lovely days..why ? because I got my first payment form Chitika, yes it's not much but I'm happy. For blogger who want earning from your blog you can join here, just as you know, Chitika is not like Google Adsense who will paid if the ads clicking by someone, chitika is more about traffic, how long user stay on your blog, how many user using search button that chitika offer with many specific search button, and more earning from region like United states, Canada, and Europe if you have traffic from that country.

here is proof of payment


so the main idea is...if your blog have alot traffic from all over the world you may consider to start using Chitika, trust me It's works [kaya' iklan Element aja.... :) ] <<<< sorry OOT..

and then this quenstion came along...???? what if I don't have any traffic, we can say I got a low traffic not from europe, even from my country that I life, Maybe you wanna try this step by step..

1. you can join here or here. this website offer you traffic for free.. for consequent, you have start sign in and surf, each time you surf you will get point that can you change with traffic for specific regional, like Europe, Canada or US traffic :)

2. start promote your blog to Forum, mailing list, for my advice.... you should searching forum from out of your regional or country and start posting in HOT topic plus don't forget to include your Blog address, more you post than more user knows your Blog.

3. copy email address that you receive on your email, let say you probably receive alot spam email, so start copying and make a new list to sent your blog address to all this GOT DAMN SPAMMER: [ sorry for my Bad languange :( ]

4. just like step No.3, this time maybe from one of your friend has sent your email forward-ing that include CC, BCC or To, so you can copy the email address and start sending your url address blog to them sometimes


that's is for know...let me know if it's work for you to increase traffic to your blog..
Warm Regard's

Create Additional shortcut on Right click


Once done, you will be able to right click any file or folder and use the Browse for Folder dialog to choose the location you want to move or copy your file or folder to, without having to go to the destination path, its cool!

First we will add the copy and move options to the right click menu of all FILES.

CLICK Start>Run, type REGEDIT and click OK to open up the registry editor and make your way to this key:

HKEY_CLASSES_ROOT\*\shellex\ContextMenuHandlers

Right click the ContextMenuHandlers key and choose New>Key.
Name the new key “Copy To” (without the quotes).
Repeat the above and create another new key named Move To.

You should now have two new subkeys under the ContextMenuHandlers key:

HKEY_CLASSES_ROOT\*\shellex\ContextMenuHandlers\Copy To
HKEY_CLASSES_ROOT\*\shellex\ContextMenuHandlers\Move To

Select the Copy To key and in the right hand pane, double click “Default”
Enter this clsid value as the value data:

{C2FBB630-2971-11d1-A18C-00C04FD75D13}

Next , select the Move To key and in the right hand pane set the default value to:

{C2FBB631-2971-11d1-A18C-00C04FD75D13}

This now takes care of the Copy and Move options for the right click context menu of all your files.
Now all that is left is to add the same options to the right click menu of all your folders.
The procedure will be the same as for files but at a different key:

HKEY_CLASSES_ROOT\Directory\shellex\ContextMenuHan dlers

Right click ContextMenuHandlers and create a new key named Copy To.
Right click it again and create another new key named Move To.

left click on the right hand pane, add the same default values as you did for Files:

For Copy To:
{C2FBB630-2971-11d1-A18C-00C04FD75D13}
For the Move To:
{C2FBB631-2971-11d1-A18C-00C04FD75D13}

Exit the registry and you are done.

Clearing the Page File on Shutdown

Another way to set the computer to clear the pagefile without directly editing the registry is:

1.Click on the Start button
2.Go to the Control Panel
3.Administrative Tools
4.Local Security Policy
5.Local Policies
6.Click on Security Options
7.Right hand menu - right click on "Shutdown: Clear Virtual Memory Pagefile"
8.Select "Enable"
9.Reboot


If you want to clear the page file on each shutdown:

1.Start Regedit
2.Go to HKEY_LOCAL_MACHINE\SYSTEM\CurrentControlSet\Control\Session Manager\Memory Management\ClearPageFileAtShutdown
3.Set the value to 1

Installing the NetBEUI Protocol

Microsoft no longer supports the NetBEUI protocol as part of WindowsXP.
You can add it as a installable protocol by going to the VALUEADD \ MSFT \ NET \ NETBEUI
directory on the CD ROM.
Note: %SYSTEMROOT% refers to the drive and directory where you installed WindowsXP.
Typically this is in the C:\WINDOWS directory

1.Copy the nbf.sys into the %SYSTEMROOT%\SYSTEM32\DRIVERS\ directory
2.Copy netnbf.inf into the %SYSTEMROOT%\INF\ directory
3.Open the Network connection properties for your local area network and use "Install..." button to add NetBEUI protocol

I included a zipped file with the above files and a simple batch file to copy both to the appropriate directories
This is only if you absolutely need NetBEUI. It is not at all a necessary requirement for most networks

Increasing File System Caching

To increase the amount of memory Windows will locked for I/O operations:

  1. Start Regedit
  2. Go to HKEY_LOCAL_MACHINE\SYSTEM\CurrentControlSet\Control\Session Manager\Memory Management
  3. Edit the key IoPageLockLimit
4096 - 32megs of memory or less
8192 - 32+ megs of memory
16384 - 64+ megs of memory
32768 - 128+ megs of memory
65536 - 256+ megs of memory

Earn Money with Search Engine

Uang dari Search Engine


http://www.myhpf.co.uk/apply001.asp?Friend=102287

[just copy link above and make as your default search engine]


kali ini saya akan menjelaskan bagaimana menghasilkan earning atau Dollar $$ dari search engine dengan hanya menjadikan nya sebagai "default search engine" dalam browser kita baik itu Internet Explorer, Mozilla Firefox ataupun Netscape [tau caranya

kan....???, kalo nggak Let me Know dengan meninggalkan pesan di shoutBox or email me... :) ]


so....., cara kerjanya adalah search engine ini mencatat setiap pencarian yang kita lakukan per/pencarian, kurang tahu juga sich berapa bobot earning yang akan diberikan berdasarkan pencarian yang kita lakukan, jadi ya gitu ajah dech..... tai sayangnya Yahoo yang dijadikan search engine menjadi Front In dalam program ini.


dengan hanya menggunakan link ini, anda sudah siap untuk menghasilkan dollar demi dollar, jadi tunggu apa lagi.... buruan....!!!!!


P.S: ini program baru dan belum tau apakah benar atau tidak mereka akan ngirimin dollar, jadi tidak ada salah nya di coba... mumpung baru-baru, seperti MLM-lah, kok baru-baru, kan lagi heboh heboh nya......

Get access to an UNC at a command prompt (Windows)

pushd \\servername\sharename

The pushd command creates a temporary drive letter that points to the network share, and then changes the command prompt to that drive letter. You can use the pushd command

several times in one session. This creates a list (or "stack") of folders. You can type pushd with no path name to view the current state of the stack.

The popd command returns you to the previous folder, and removes the temporary drive letter that was created by the pushd command.

Connect 2 Laptop Without LAN

Jaringan Ad hoc

Jaringan wireless ad hoc sangat cocok dilakukan pada saat saat penting untuk menghubungkan dua buah laptop atau lebih secara langsung tanpa membutuhkan peralatan tambahan seperti wireless router atau access point. Tidak hanya untuk keperluan File Sharing, bisa juga untuk share koneksi internet lho.

Konfigurasi yang dibutuhkan tidaklah rumit. Untuk membuat jaringan wireless ad hoc, tiap wireless adapter cukup di setting menjadi Mode Ad Hoc (mode standart adalah infrastructure mode).

OS : Windows XP

Cara mensetting laptop utama. - Klik Start> Control Panel> Network Connections. - Klik kanan pada wireless network connection, lalu klik Properties


- Pada Wireless Network Connection Properties, klik tab Wireless Networks - Klik Add pada bagian Preferred networks


- Selanjutnya isilah Network Name (SSID) untuk jaringan yang akan anda buat - Jangan lupa untuk mencentang check box This is a computer-to-computer (ad hoc)network: wireless access point are not used - Anda juga dapat membubuhkan WEP Password agar koneksi anda aman.


- Klik OK dan OK lagi untuk menyimpan konfigurasi anda.

Cara mensetting laptop lainnya.
Windows XP otomatis akan mendeteksi jika ada Wireless Network yang aktif


- Klik kanan pada icon Wireless Network yang berada pada taskbar, lalu klik View Available Wireless Networks.


- Wireless Network Connection akan menampilkan list SSID wireless anda. Klik SSID wireless anda lalu klik Connect.


Jika pada laptop utama ada anda bubuhkan WEP Password maka windows XP meminta anda untuk mengisi password sebelum anda terkoneksi ke jaringan ad hoc anda.

Bermain-main dengan Registry

Beberapa tips dan registry dibawah ini cuma berlaku buat Windows XP.

Sebelum mengutak-atik Registry, ada baiknya melakukan backup terlebih dahulu.
1. Klik tombol Start > Run.
2. Ketik regedit dan tekan Enter setelah berada didalam jendela Run.
3. Didalam Registry Editor, pilih menu File > Export.
4. Setelah Export Registry File muncul, masukkan nama file ke bagian File Name, misalnya backup-registry dan sebagainya.
5. tekan tombol Save.


Mempercepat Update Registry
Tekan tombol Start > Log Off > Log Off.

Mengganti Wallpaper
HKEY_CURRENT_USER/Control Panel/Desktop
Klik ganda pada wallpaper dan masukkan path gambar yang diinginkan pada Value Data.

Mengganti Nama Recycle Bin
HKEY_CLASSES_ROOT/CLSID/{645FF040-5081-101B-9F08-00AA002F954E}
Klik ganda pada option (Default value) dan beri nama baru sesuai yang diinginkan pada Value Data.

Memunculkan Rename Pada Recycle Bin
HKEY_CLASSES_ROOT/CLSID/{645FF040-5081-101B-9F08-00AA002F954E}/ShellFolder
Klik ganda pada Attributes > Edit Binary Value. Pada Value Data, ganti angka tersebut menjadi 0000 50 01 00 20.

Menyembunyikan Recycle Bin HKEY_LOCAL_MACHINE/Software/Microsoft/Windows/CurrentVersion/Explorer/Desktop/NameSpace
Hapus subkey {645FF040-5081-101B-9F08-00AA002F954E}, kemudian Restart komputer untuk melihat hasilnya. Untuk memunculkannya kembali, buat kembali kombinasi angka {645FF040-5081-101B-9F08-00AA002F954E}.

Menambah Isi Shortcut Menu Pada Recycle Bin
HKEY_CLASSES_ROOT/CLSID/{645FF040-5081-101B-9F08-00AA002F954E}/ShellFolder
Klik ganda Attributes dan ganti angka di Value Data dengan angka berikut ini:
0000 50 01 00 20 > Rename
0000 60 01 00 20 > Delete
0000 70 01 00 20 > Rename & Delete
0000 41 01 00 20 > Copy
0000 42 01 00 20 > Cut
0000 43 01 00 20 > Copy & Cut
0000 44 01 00 20 > Paste
0000 45 01 00 20 > Copy & Paste
0000 46 01 00 20 > Cut & Paste
0000 47 01 00 20 > Cut, Copy & Paste

Menambah Isi Shortcut Menu Pada Recycle Bin Dengan Menu Pilihan
HKEY_CLASSES_ROOT/CLSID/{645FF040-5081-101B-9F08-00AA002F954E}/Shell
Klik menu Edit > New > Key dan beri nama yang diinginkan (Misalnya: Go To Windows Explorer). Dibawah key yang baru tersebut, tekan lagi menu Edit > New > Key dan buat sebuah key baru bernama Command. Klik ganda option (Default), dan pada bagian Value Data, isi dengan path Windows Explorer ( C:\WINDOWS\Explorer.exe).

Mengembalikan Folder Documents Yang Hilang Di My Computer HKEY_LOCAL_MACHINE/Software/Microsoft/Windows/CurrentVersion/Explorer/DocFolderPaths
Pilih menu Edit > New > String Value dan beri nama sesuai dengan username yang digunakan di Windows (contohnya: Chippers) Klik ganda pada value tersebut dan masukkan path tempat dimana Documents anda berada (contohnya D:\Documents)

Menyingkirkan File Stored Dari My Computer HKEY_LOCAL_MACHINE/SOFTWARE/Microsoft/Windows/CurrentVersion/Explorer/MyComputer/NameSpace/DelegateFolders Hapus subkey {59031a47-3f72-44a7-89c5-5595fe6b30ee} dengan menekan tombol Del.

Menyembunyikan My Recent Documents HKEY_CURRENT_USER/Software/Microsoft/Windows/CurrentVersion/Policies/Explorer
Klik menu Edit > New > DWORD Value dan beri nama NoRecentDocsMenu. Kemudian klik ganda pada DWORD Value tersebut, dan berikan angka 1 untuk mengaktifkannya.

Menyembunyikan Menu Find HKEY_CURRENT_USER/Software/Microsoft/Windows/CurrentVersion/Policies/Explorer
Klik menu Edit > New > DWORD Value dan beri nama NoFind. Kemudian klik ganda pada DWORD Value tersebut dan berikan angka 1 untuk mengaktifkannya. Restart komputer.

Menyembunyikan Help And Support HKEY_CURRENT_USER/Software/Microsoft/Windows/CurrentVersion/Policies/Explorer
Buatlah sebuah DWORD Value baru - Menu Edit > New > DWORD Value, dan beri nama NoSMHelp. Kemudian klik ganda pada NoSMHelp dan isi dengan angka 1 pada Value Data. Restart komputer.

Menyembunyikan Menu Run HKEY_CURRENT_USER/Software/Microsoft/Windows/..............................

download full PDF here

Personalized Boot Logo Screen

Two or three times a week I get an e-mail asking if it's possible to modify the Windows boot screen; the black screen that says Microsoft Home or Professional and has the scrolling green or blue bars. There are many sites that offer customized boot screens for download, but it's unlikely you'll find one specifically tailored to your personal situation. For the price of a couple of free downloads and some of your time you can alter the default boot screen to reflect your personal taste.
So there is no confusion what this procedure accomplishes, I'm going to start off with two images. The screen capture in Fig. 01 is well known by anyone that has used Windows XP. In Fig. 02 you see the boot screen that I modified for use on my home systems. The modified screen is quite simple in this case, but you can make it as complex as you desire during the editing phase....


Warning
This procedure involves modifying files essential to proper system operation.
While I have tested and used the procedures, there is substantial risk involved in implementing these modifications. Proceed at your own risk.
Understand that I provide NO support and assume NO liability for damage to your system.
I strongly suggest you test this procedure on a separate XP installation before attempting it on a primary system or drive that you can't afford to reformat.


As long as you've read the above warning and understand the dangers involved, gathering the tools to do the job is the next step in the procedure.
The Tools
Resource Hacker - Resource HackerTM is a freeware utility to view, modify, rename, add, delete and extract resources in 32bit Windows executables and resource files (*.res). It incorporates an internal resource script compiler and decompiler and works on Win95, Win98, WinME, WinNT, Win2000 and WinXP operating systems. Navigate to
http://www.users.on.net/johnson/resourcehacker/and download Resource Hacker.

Jasc® Paint Shop Pro® 7 Anniversary Edition - Paint Shop Pro offers the easiest, most affordable way to achieve professional results! Don't waste your time with high-end professional products that cost a fortune and take a lifetime to learn. And don't settle for slow, cookie-cutter programs that tie you to templates. Get Paint Shop Pro. Navigate to http://www.jasc.com/download_4.asp?prod=001 to download a fully functional, 30 day free trial version that can be used in this procedure.
Once you have the above items you're ready to proceed with the modifications. If you prefer to use a different graphics program than the one I mentioned above it's possible. Because of the way the logo graphics are stored it's necessary to use a graphics program that allows pallets to be imported.

 
Copyright © 2011 Blogger with Love | Themes by Edit-me.